
It has been almost two years with a Benq monitor, and the results are perfect, yet I want the color palette and display to be more accurate. Color calibration is the best option, according to me, as it is specially designed for photographers. The monitors are pre-calibrated while manufacturing itself but still, if you want the best possible color, then color calibration is not difficult at all. The calibration of color is totally per computer and per video card. In this article, you will get to know how to calibrate Benq monitor along with all the Benq color settings.
How to Calibrate Benq Monitor?
So let’s start “How to calibrate Benq monitor.” Follow the steps below and learn the process of Benq calibration:
Start fresh!
For Benq color calibration you need to follow the fundamental step. Uninstall any previously installed color calibration systems. I would recommend the users to use one calibrating system at a time. Clear the monitor screen if it is having any debris or crud. In search of high-end picture quality, you also need to maintain the outer layer of the monitor clean and dust-free.
Disable hurdles
If you want your screen’s appearance to be entirely modified for the Benq color calibration process, follow these short steps as given below:
- Firstly, disable the screen saver.
- Turn off any monitor power management.
- Also, turn off / disable the night mode.
As soon as you are done with calibration, you can enable all of these back.
Get in touch with PME
PME is the Palette Master Elements software, which is a free software for the Benq color calibration. So what are you waiting for? Before my instructions to you to download the software, quickly download and install PME.
Connecting and processing
PS: This is the most important step for Benq color calibration, so DO NOT risk to skip it or miss any point.
With the help of the supplied Benq USB cable, plug PME in the monitor’s USB connection. After that, PME with directly work with your Benq monitor. The connection also enables USB ports that are downstream i:e on the sides of the monitor.
If you miss out on connecting PME successfully, don’t worry, the monitor will lead and help you with a pop-out message of “unable to find the FTDI driver or Are the FTDI drivers installed? Plug the USB and restart the system along with software and Palette Master. This would help your monitor to find the presence of PME.
Calibrate with connection
As now, you are well connected with the Palette through a USB connection. Let’s now connect your calibrator. I would recommend you to connect your calibrator among the downstream ports. You can also try another port too. There is no question on the compatibility of the palette master, but at times the software can be a little fussy, and there are least chances of losing connections in downstream ports.
Setup

Setup is the most significant space, so once PME opens, you will see a screen, and there, your monitor should be rightly recognized before entering PME. Now plug it and choose “check senor,” this was you confirm the information.
Setting up display
When it comes to displaying settings, there are n no. of settings that you need to do. Few such settings need to be done on a prior basis, and the rest is as per the convenience and necessity. So despite of connection, you need to set the display for Benq color calibration.
Whitepoint:
If you are dealing with edits and printing of pictures and designs, then the most reliable and standard white point is 6500K. You can also call it D65. It gives fine art prints and a typical photo lab.
RGB Primaries:
As we all know, the Benq monitor is wide, so to look out for all the colors, we need to use Panel Native. The most appropriate gamut monitor standard would be sRBG or DCI-P3.
Luminance:
If you have noticed, most of the print works at a range of 80 to 120 cd/m2. If you see your prints darker as expected, you can recalibrate the figures; if you want an obscure video, than you can also maximize the luminance.
Blackpoint:
This one ultimately depends upon your need, whether you want a deep black or the most accurate black version in your picture. Set black to the lowest possible point a contrast ratio of the panel.
So when you are done with all the Benq color settings you need to click next to keep going.
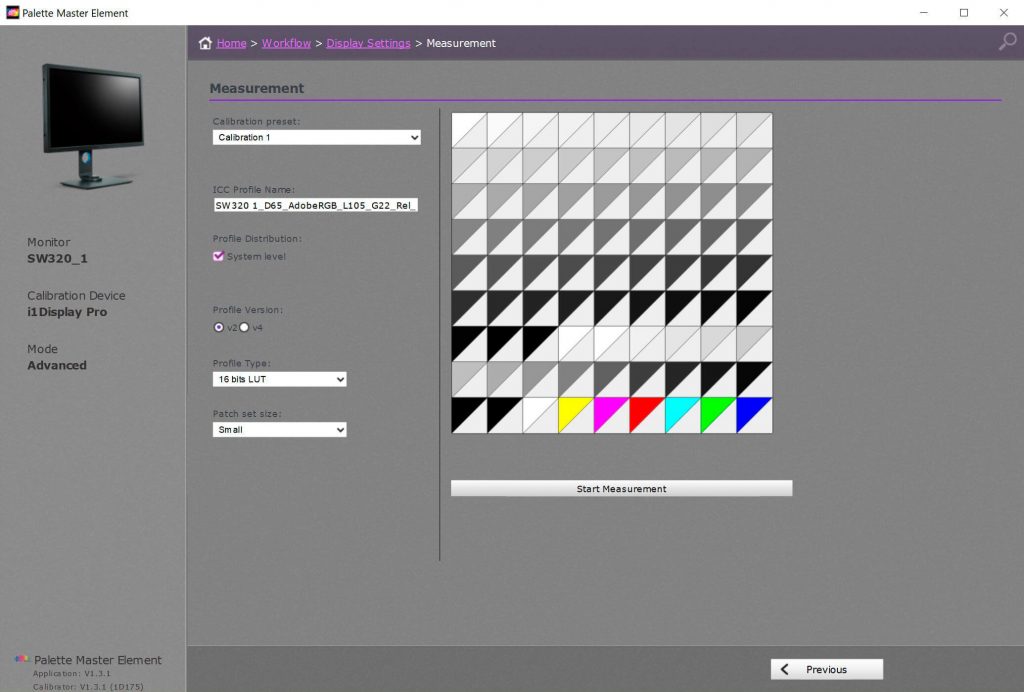
Measurement settings:
To calibrate Benq monitor there are various measurements and different Benq color settings. So, for measurement settings, you need to work with ICC Profile name, System Level, Profile Version, Profile type, and Patch Set Size.
Validation results:
Hit validation calibration with the same measuring instrument to get the most comprehensive results on the screen. And for extended results, you can also follow some more detailed steps.
Calibration “Done and Dusted”
After all these hard work and methods, you have successfully completed the calibration without any mistake. The main motto of calibrating the system is to gain the most gorgeous colors in front of our eyes when you work. Here’s the end to Benq color calibration.
This is it, I am ending this article here and hope you would have loved it and can calibrate Benq monitor. Stay tuned for more such useful and informative articles.